


Is your lawn struggling to thrive despite your best efforts with water and fertilizer? The hidden culprit might be lurking just beneath the surface—an issue that turf dethatching is designed to correct.
Thatch is a natural layer of organic material. It forms between green grass blades and the soil. A thin layer is beneficial, but when it becomes too thick, it creates a barrier.
This dense mat can block essential water, nutrients, and air from reaching the roots of your grass. This leaves the roots trapped and vulnerable to heat, drought, and disease.
Not every lawn needs dethatching. Understanding when this lawn care practice is necessary is key. It can restore health and beauty to struggling lawns.
This guide will help homeowners identify thatch problems. It covers the right timing and methods for effective lawn care. The goal is to empower you with knowledge for a lush, healthy yard.
Key Takeaways
- Thatch is a natural layer, but excessive buildup can harm your lawn.
- A thick thatch layer blocks water, air, and nutrients from grass roots.
- Not all lawns require dethatching; it is a strategic solution, not a routine task.
- Proper turf dethatching can resolve issues like poor drainage and increased pest susceptibility.
- Identifying the right time and method is crucial for effective lawn care.
- This guide provides comprehensive information to make informed decisions about your lawn’s health.
Understanding Thatch and Turf Dethatching

Many homeowners are unaware of the complex ecosystem developing just beneath their lawn’s surface. This underground world plays a crucial role in determining whether grass thrives or struggles.
What Is Thatch?
Thatch forms as a natural mat of organic materials at the base of grass plants. It consists of dead grass, living shoots, stems, roots, and decomposed leaf matter.
This layer accumulates where plant stems meet the root zone. It builds up when new organic matter forms faster than old material breaks down.
Benefits and Drawbacks of Thatch Layers
A thin thatch layer measuring less than half an inch provides valuable benefits. It acts as natural mulching that conserves soil moisture and protects against temperature extremes.
This protective cushion also supplies nutrients as organic material gradually decomposes. However, problems arise when the layer exceeds one inch in thickness.
Excessive thatch creates barriers that block water, air, and nutrients from reaching grass roots. It can trap roots within the thatch itself, making them vulnerable to heat stress and drought.
Certain grass types like Kentucky bluegrass accumulate thatch more readily. Soil conditions and maintenance practices also influence buildup rates.
When to Dethatch Your Lawn

The decision to dethatch hinges on two critical factors: measurement and timing. Homeowners should verify the need before starting this lawn care process.
Identifying Excessive Thatch Buildup
Check your lawn’s thatch layer with a garden trowel. Dig a small wedge that includes grass and soil. Measure the dead, woody material between green blades and soil.
A layer exceeding 3/4-inch thick may require intervention. Thatch measuring 1-2 inches often shows visible symptoms. These include poor grass color and weak growth.
Physical signs help identify excessive buildup. The lawn may feel spongy underfoot. Water might struggle to penetrate the soil surface.
Seasonal Timing for Cool-Season and Warm-Season Grasses
Proper timing varies by grass type. Cool-season grasses need late summer or early fall dethatching. This aligns with their peak growth period.
Warm-season grasses require different timing. Dethatch them after spring green-up. Early summer, following the second mowing, works best.
Never dethatch when your lawn is dormant or stressed. The process works best during active growth. Soil should be somewhat moist for optimal results.
How to Dethatch Your Lawn Effectively

Homeowners have several options when it comes to removing excess thatch from their yards. The right approach depends on lawn size and thatch thickness. Proper technique ensures healthy grass recovery.
Step-by-Step Dethatching Process
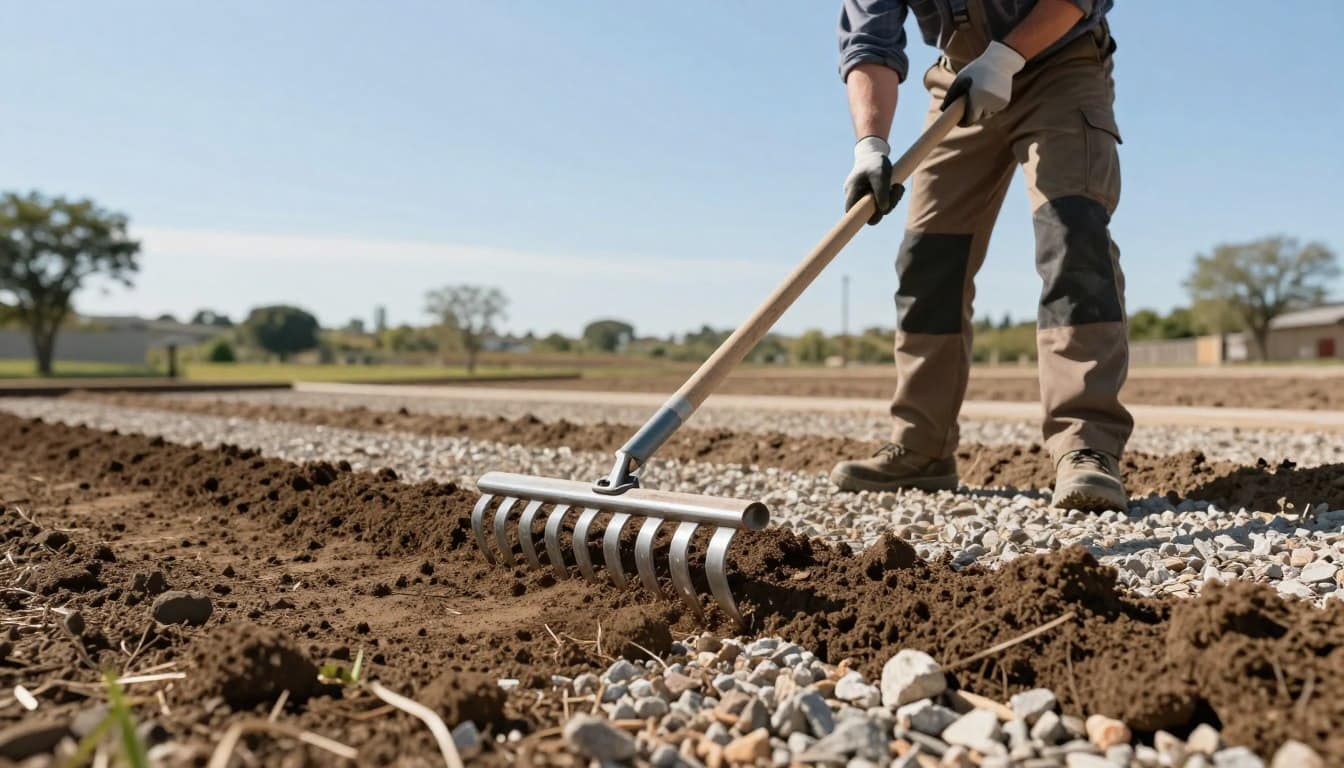
Begin by selecting the appropriate tool based on your lawn’s needs. For small areas with light buildup, manual rakes work well. Push the tines deeply through grass blades to reach the thatch layer.
Work systematically across the lawn in parallel passes. Crisscross patterns ensure thorough coverage. Always rake up all debris after completing the process.
Water the lawn thoroughly to aid recovery. This helps reduce stress on grass roots. Proper hydration supports healthy regrowth.
Choosing Between Manual and Power Tools
Manual dethatching rakes feature curved blades and short tines. They dig into the lawn to pull up thatch effectively. These tools suit small lawns with moderate buildup.
Power rakes use rotating tines that dig into soil level. They work efficiently on lawns with thinner thatch layers. Equipment rental stores often carry these machines.
Vertical mowers have adjustable blades for thick thatch removal. They slice through the thatch layer into soil. Professional help may be needed for excessive buildup over two inches.
Turf Dethatching: Best Practices and Common Mistakes
Strategic lawn maintenance requires knowing when to combine procedures versus when to use them separately. Core aeration and thatch removal serve different purposes but can work together effectively.
Avoiding Over-Dethatching
Lawn care experts now recommend a more cautious approach to removing excess organic material. While once considered annual routine, aggressive raking can damage grass roots.
Overly vigorous removal exposes soil and increases moisture loss. This creates ideal conditions for weed germination. It may also deprive plants of essential nutrients.
Power equipment must be adjusted carefully for different grass types. Cutting too deeply can harm the plant crown. Proper technique prevents long-term lawn problems.
Integrating Aeration and Overseeding
Core turf aeration removes small soil plugs containing thatch material. This process creates channels for air, water, and nutrients to reach compacted soil below.
Regular aeration every few years helps break down organic matter naturally. It prepares the lawn for more thorough thatch removal when needed.
Combining these processes with overseeding yields excellent results. The exposed soil provides perfect conditions for new grass seed establishment. Timing during active growth ensures rapid recovery.
Post-Dethatching Lawn Care and Recovery
This period immediately after dethatching offers a unique opportunity to revitalize your lawn. The process exposes bare soil and loosens the ground around grass blades. This creates perfect conditions for introducing new life.
Homeowners should seize this chance to overseed. The exposed soil provides excellent contact for grass seed. This helps new seeds germinate successfully and establish strong roots.
Watering, Fertilization, and Nutrient Management
Thorough watering is the first critical step after removing debris. It relieves stress on the existing grass and provides moisture for new seed. The lawn should be kept consistently moist to support growth.
Applying fertilizer supplies essential nutrients for recovery. Choose a product formulated for new seedlings and established grass. This balanced approach supports the entire lawn without promoting future thatch.
Combination products offer a convenient solution. These often include premium grass seed, professional-grade fertilizer, and soil enhancers. They provide a complete package for post-dethatching care.
For cool-season grasses dethatched in early fall, overseed immediately. Warm-season grasses treated in early summer benefit from the same prompt attention. Proper timing ensures the best results for years to come.
Maintenance Tips to Prevent Future Thatch Buildup
The best way to avoid the need for turf dethatching is to create conditions where thatch decomposes naturally. Smart lawn care focuses on balancing growth with decomposition. This prevents the dense layer from forming in the first place.
Simple changes to your routine can make a big difference over the years. Healthy soil and proper maintenance are the keys to success.
Regular Soil Testing and pH Balance
Test your lawn’s soil every three to four years. This reveals pH levels and nutrient content. Follow the test recommendations to create ideal conditions for grass.
Proper pH balance encourages beneficial microorganisms. These tiny helpers break down organic matter quickly. Applying lime when needed boosts their activity.
Annual turf aeration helps heavy soils. It lets air, water, and nutrients reach the root zone. This promotes deep root growth and reduces compaction.
Proper Mowing and Watering Techniques
Good mowing habits are crucial. Keep blades sharp and never cut more than one-third of the grass blade. This reduces stress and limits excess clippings.
Water your lawn deeply but infrequently. Shallow, daily watering encourages weak surface roots. It also leads to overly rapid growth.
Avoid high-nitrogen fertilizers that push fast growth. Follow soil test guidelines for feeding. This provides necessary nutrients without causing future problems.
Conclusion
Proper lawn management combines strategic intervention with consistent preventive care. Understanding when your lawn truly needs attention prevents unnecessary work while ensuring grass receives what it requires for healthy growth.
Strategic dethatching performed at the right time helps restore lawn health by removing barriers that block essential resources. This process allows water, air, and nutrients to reach grass roots effectively. Combined with smart maintenance practices, it supports vigorous growth for years.
Homeowners who learn proper techniques can maintain beautiful lawns with confidence. Regular soil testing, appropriate fertilization, and wise watering minimize future thatch problems. This knowledge empowers people to make informed care decisions for lasting lawn beauty.